In this tutorial we show you why the Black and White adjustment is better than desaturation and we will take a colored photo and add a Sepia tone which will allow the image to look aged. We will even show you how to add some grain to the photo which will add to the realism of an aged photo. Throughout this course we will give you many tips and tricks on improving the black and white or sepia image. Of course, the video (online/offline), written, PDF files, supporting files and quiz are FREE!
Currently we are using Windows Vista Home Premium 64 Bit and the Photoshop CS4 Extended 64 Bit version.
Knowledge You Need to Know:
If you are unfamiliar with certain areas that are not covered in this tutorial, feel free check out other tutorials on our website. We have many different types of tutorials that can be downloaded (Video, PDF) or viewed online that will train you for free! Once you have the knowledge, feel free to come back and go through this tutorial again.
Preparing For This Tutorial:
You will be using a picture of this cowboy. If you do not have this image, please scroll down to the image for “Click Picture To Download Supporting Files” and download the image. Please open the image PE-BWHORSE in the Photoshop Program.
Black And White Adjustment Overview:
So why would we go over the black and white adjustment tool when we already showed you that you can make a black and white image by desaturating an image in the Hue/Saturation or other tools? When you take a black and white photo with a color camera, it takes in account for the colors. Even though it shows a dark gray Photoshop still knows the specific color it once was. Why is this better? Because you can adjust specific colors that were converted in black and white. When you desaturate, it ignores all color values.
Getting a bit more technical, desaturate only leaves luminous values, which indirectly make your shades look worse. A better adjustment than desaturation is to use the black and white adjustment tool in Photoshop.
Black And White Adjustment:
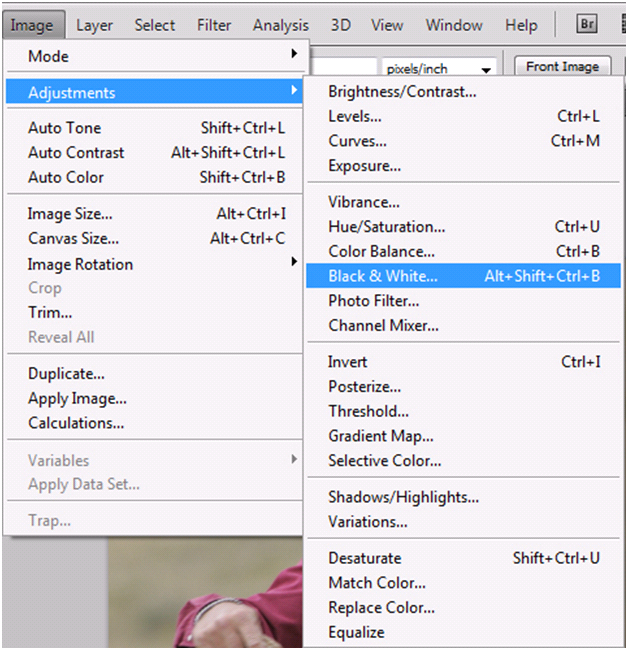
To use this tool, Left click the “Image” menu and move the mouse pointer down to “Adjustments” and then from the sub-menu Left click the “Black & White…” command.
Here is a list of the first few options in this adjustment screen.
| A). A Preset is a predefined setting for a black and white adjustment. | |
| B). The Preview allows you to see the changes on the image as it happens. | |
| C). For this example, Left click the Auto button. | |
| D). Left Click “OK” to accept changes. “Cancel” to disregard changes. |

More options!
| A). These slider bars can be adjusted by moving the mouse cursor over the up arrow and holding down the Left mouse button and dragging it left or right. Release the Left mouse button when you are happy with the changes. | |
| B). For each color (Reds, Yellows, Greens, Cyans, Blues, Magentas) you will have a text box that you can enter a numeric value into. |
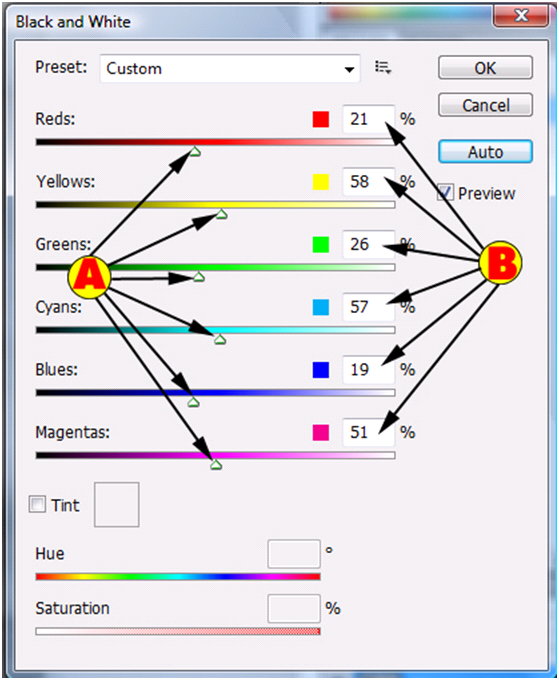
You will find the “Auto” does a good job. We usually will start off with using the “Auto” button and manually adjust each color.
On our example we used: Reds: -10, Yellows: 66, Greens: 101, Cyans: 131, Blues: 23, and Magentas: 77.

Even though the image does not look perfect, you will see that it did an excellent job at adjusting it to a black and white image. If we took longer than a few seconds to adjust, the image would have come out looking even better, but for now it looks good. In the next few sections, we will be improving on this image.
Improving On Black And White Adjustments:
Because Photoshop remembers the initial colors, you can adjust specific areas as you can see from moving the sliders. What if you did not know the color? Photoshop makes it easy to determine what color to adjust and allows you to adjust the color at the same time.
Move your mouse pointer over to the image and hold down the Left mouse button over the shirt. You will see the color in the black and white adjustment screen will put a box around the color. This tells you that Photoshop has determined the shirt color is similar to a red.

You will see if you are still holding down the Left mouse button a pointer that shows a finger with a left and right arrow. Drag your mouse to the left to darken that area or to the right will lighten that area. Release the Left mouse button when you are happy with the changes. **For this example, move the mouse pointer to the right. We realized that the shirt was to dark, so we ended up adjusting it to a 17. You could repeat the process and try another color such as the sky to even enhance the black and whites more.
You will see a large difference between a desaturated image versus the black and white adjustment when there are a lot of colors in the image. This image has very few colors, but works for this tutorial.
Sepia Tone:
What is Sepia Colors? Sometimes you look at an older picture and you see a lot of brown colors in the image. That is a Sepia tone. Instead of using a gray scale to make an image black and white, a brown scale is used. The results of the image are a monotone in shades of brown. Let’s show you how you can achieve this effect in Photoshop!
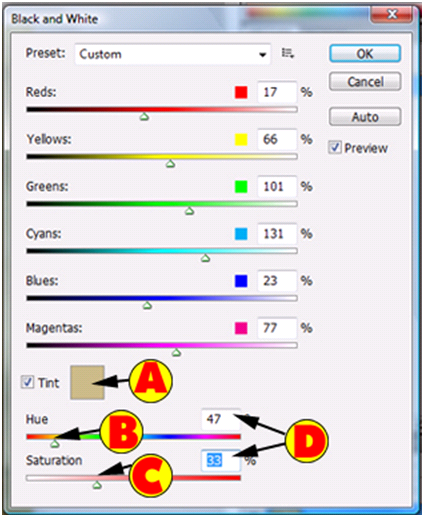
Left click the “Tint” checkbox in the left hand corner.

You will notice now you have access to the Hue and Saturation slider bars. To adjust the slider bars, move the mouse pointer to the up arrow and hold down the Left mouse button. Now drag it left or right. Release the Left mouse button when you are happy with the changes.
| A). As you change the Hue, it will display the color it is tinting. You can also Left click this colored box and change the color! | |
| B). In previous tutorials we explained that the Hue is basically the color. | |
| C). In previous tutorials we explained that the Saturation is how vivid or intense the color (or Sepia/Black and White) is. | |
| D). You can also change the Hue/Saturation values by Left clicking the text boxes and entering a numeric value. On this example, change the Hue to 47 and Saturation to 33. |
Photoshop Tip – Even after tinting, you can still adjust the colors.
Adding Some Grain:
In the future, we will create an additional tutorial that will show you how you can add scratches, rips, tears and more noise to an image to make it look as if the picture was taken many years ago For now, let’s show you 1 basic trick that will add grain to an image. Why add faults to this image? To make it look older.
Left click the “Filter” menu and move your mouse pointer down to “Texture”. From the sub-menu, Left click on the “Grain…” Filter.
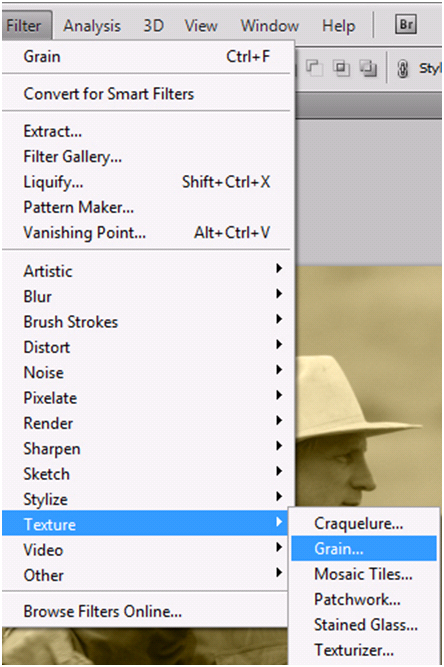
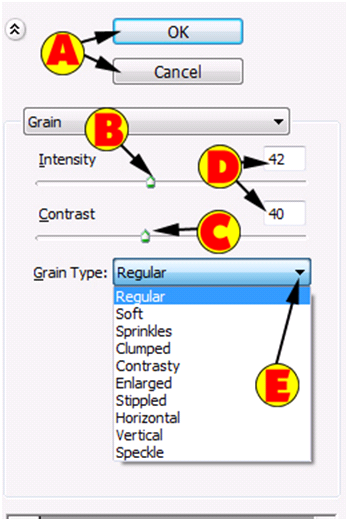
You will now see the following dialog box. For the slider bars, move the mouse pointer to the up arrow and hold down the Left mouse button and drag it left or right. Release the Left mouse button when you are happy with the changes.
| A). When you are happy with the changes, Left click the “OK” button and if you want to disregard the changes, Left click the “Cancel” button. On this example, when you are done with the correct changes, Left click the “OK” button. | |
| B). The Intensity tells Photoshop how strong you want the grain to be. | |
| C). The Contrast tells the program how bright or dark the grain will be. | |
| D). Enter numeric values for the Intensity and Contrast. For this tutorial use: 42 for the Intensity and 40 for the Contrast. | |
| E). The Grain Types are presets in Photoshop. Left click the drop down box and Left click a Grain Type. On this example, make sure it is set to “Regular”. |
Before And After:
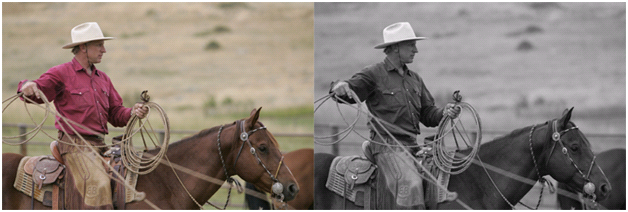
It may not look exactly perfect, but if you took your time adjusting the values, you can come up with an excellent black and white or sepia image. Here is the before and after images.

Additional Tips And Tricks With Black And White Adjustments:
Here are some Tips and Tricks you can use with the black and white adjustments.
| 1). Want to enter the numeric values quickly (works with any text boxes)? Left click the starting text box and enter the value. Press the <TAB> key to move to the next text box. Need to go back to the previous text box? Hold down the “Shift” key and press the <TAB> key on the keyboard. Release the “Shift” key and you will find that you are now back in the previous text box. | |
| 2). If you want to add realism to making your photo look old, add scratches, rips, tears and even blurred areas to the image. You also have to be careful and aware of objects that would not be in a photo in that era. Example, you take a picture of a modern cowboy in an old town (buildings look aged). The picture looks great, except for the cowboy is standing on cement and there is a car in the back of the picture. What you do? The easiest method is to cutout the cowboy and add it to another image that has an old town, no cars, and no cement roads. When you make this switch, you will want to make sure your perspective and size of the cowboy is correct. You will need to make sure your shadows are correct, but end result you can make it truly look like the image was taken a long time ago. What if you wanted to keep the old buildings in the background in the current photo? You can remove the cement and add from another picture sand/dirt to the ground. You would need to play around with the perspective to make it look right. For the cars, you could clone those specific areas. In a future tutorial we will be covering all of the ways to make your image look more real as if it was taken 100 years ago. | |
| 3). Not 1 adjustment setting is perfect for every photo. Here are the steps that we do to come up with the best black and white or sepia photo. 1). Get the image correctly adjusted before you convert it into a black and white photo (use curves, exposure, levels, brightness/contrast, etc.). 2). Use the “Auto” button for a base adjustment in the black and white adjustment screen. 3). Move to different colors in the actual image and use the trick to hold down the Left mouse button and drag the mouse to adjust that specific area. 4). If you are converting it into Sepia, Left click the Tint option and now make the adjustments. 5). Use the adjustment tools (curves, levels, etc.) again to final tweak your image. 6). Now, save the image. Change the settings to try to improve on the image and save it again. Do this trial and error with 3-5 different settings. Now open all 3-5 images and you will find 1 image will stand out above the rest. | |
| 4). Sometimes you will change a color in the black and white adjustment and it appears nothing is changing in the actual image. This happens when either that color is not in the image or that there is only a small amount of that color in the actual image. What you want to be careful with is, sometimes there are small amounts of that color is in the image and you do not notice the changes. Want to find out if that color is in that image? Crank the color slider bar all the way to the left or right. Do you notice any grays or sepia changing? If so, you have your answer. If no, than that specific color is not in the image. | |
| 5). Some people pronounce Sepia incorrectly. Here is an easy way to remember how to say it. Say the word “Sea” and then the letter “P” and then the word “Yeah”. So it is “Sea”-“P”-“Yeah”. Don’t worry, we get it wrong also sometimes. If you review the video tutorial, we would not be surprised if we said it incorrectly. | |
| 6). One way to only make a black and white in a specific area of a photo is to make a selection first. Once you have made the selection, than make the black and white adjustment and it will only change that specific selection area. |

1). What is one reason why it is better to use the black and white adjustment versus the desaturation?
| A). The black and white adjustment is much easier to use than desaturation. | |
| B). The black and white adjustment only allows to adjust the colors into a gray scale. | |
| C). The black and white adjustment remembers the colors, which allows you to adjust the black and white for that color only. | |
| D). The black and white adjustment can only change the colors into black and white and there is very little amount of adjusting you can do once it is converted. |
2). The Sepia tone adjustment is really called what in the black and white adjustment screen?
| A). Sepia. | |
| B). Tones. | |
| C). Color. | |
| D). Tint. |
3). If you do not know the actual color that you want to adjust, how do you have Photoshop determine the color for you?
| A). Move your mouse pointer to the image and hold down the Left mouse button and it will select the correct color to adjust. | |
| B). Just guess the color and move the slider. That is the easiest way. | |
| C). The only way is for you to turn off the “Preview” option and look at the color. | |
| D). Left click the “Color Locator” button. This will turn your mouse pointer into a half filled vile which allowS you to select the color from the image. |
4). If you need to enter more than 1 value in a text box, what keyboard shortcut did we tell you can use to advance to the next text box (not previous text box)?
| A). CAPS Lock. | |
| B). Shift-<TAB>. | |
| C). <TAB>. | |
| D). ALT-“7”. |
5). The Grain Filter is located in what sub-menu?
| A). Grain. | |
| B). Texture. | |
| C). Noise. | |
| D). Distort. |
6). What did we tell you about the “Auto” button in the black and white adjustment screen?
| A). Never use it or else it will cause problems. | |
| B). Make your adjustments manually and then use it. | |
| C). Only use it when you can’t make the image look good through manual adjustments. | |
| D). Use it at the start and then manually adjust from that point. |
7). Which statement below is correct for the black and white adjustment screen?
| A). You can’t make a sepia tone color. | |
| B). You can’t adjust the hue, until you Left click the tint option. | |
| C). You can’t enter the numeric values for each color. | |
| D). You can’t adjust a specific color only. |
8). Adjustments are located in what main menu?
| A). Image | |
| B). Edit. | |
| C). Color Adjustments. | |
| D). Colors. |
9). How can you tell if a specific color is in the image?
| A). The easiest way is to use the finger with the left and right arrows and check each pixel. | |
| B). Left click the “Color Range” option in the black and white adjustment screen and it will show you the colors that it found in the image. | |
| C). Either move the slider bar to the far left or far right and if that color is in the image, you will be able to see it. | |
| D). Under “Reports” menu, run the “Color Range” report to identify what colors are in the specific image. |
10). The “Intensity” option in the Grain menu does what?
| A). It tells Photoshop how bright the grain will be. | |
| B). It tells Photoshop how dark the grain will be. | |
| C). It tells Photoshop what shade of gray it will be. | |
| D). It tells Photoshop how strong the grain will be. |
Answers: 1). C, 2). D, 3). A, 4). C, 5). B, 6). D, 7). B, 8). A, 9). C, 10). D
Scoring:
0 - 5 = Please review the video tutorial and re-read this document either offline (PDF) or online.
6 – 8 = We would recommend that you print this document off and read it at a later time.
9 – 10 = Congratulations you have passed the quiz. Go ahead and view another tutorial on our site.
We hope you enjoyed this detailed tutorial. Please visit us at: http://www.Photoshopeducation.blogspot.com to expand your knowledge within Adobe Photoshop.

Click Picture To Download Video File To View Offline
Download Total Video Player, iTinySoft

Click Picture To Download PDF Tutorial
Download Adobe Reader, Adobe Corporation
Click Picture To Download Supporting Files
(Brushes, Textures, Fonts, Images, Actions, .PSD, Etc.)
Download ZipGenius Standard Edition 6.0.3.1150, Dicono di ZipGenius


I really like the tone of black and white, and sepia. It brings classic look to the fashion illustration I have made.
ReplyDeleteYour exactly right, the black and white photos and sepia adds a nice touch. We find that certain photos are just meant to be black and white or sepia.
ReplyDelete