Now that we have gone through 44 different beginner tutorials, it is time show you a few more important tips and tricks in Photoshop. There are 10 tips in this tutorial and they are all related to previous tutorials. We want to either show you an easier or even a different way to accomplish a certain task in this graphics program. We felt that 10 tips are enough for you to chew on for now. In the future, we will be releasing more tricks! These are NOT full tutorials and are only quick tips and tricks to this confusing program. These tips will cover from course #1 to course #44.
Currently we are using Windows Vista Home Premium 64 Bit and the Photoshop CS4 Extended 64 Bit version.
Knowledge You Need to Know:
If you are unfamiliar with certain areas that are not covered in these quick tips and tricks, feel free check out other tutorials on our website. We have many different types of tutorials that can be downloaded (Video, PDF) or viewed online that will train you for free! Once you have the knowledge, feel free to come back and go through this list of quick tips.
Preparing For This Tutorial:
You will be using an image of 2 ducks. If you do not have this image, please scroll down to the “Click Picture To Download Supporting Files” and download the image. Please open the image PE-QUICKTIPS2 in the Photoshop Program.
Tip #1 – Fixing Over And Under Exposed Images Quickly:
Wouldn’t it be nice if there was a very quick way to fix over and under exposed images? If an image is overexposed (to light), duplicate the background layer and change the top layer to a Multiply layer blending mode. Use the Opacity to turn down the strength. Is the image underexposed (to dark), than use the Screen layer lending mode. Here is the example of the Multiply.

Tip #2 – Change The Brush Quickly
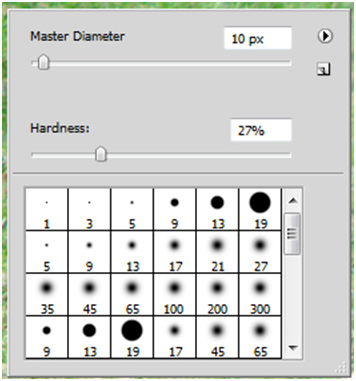
If you use the brush a lot in Photoshop, than you will love this tip. Instead of constantly going up to the settings to change your brush type, you can Right Click anywhere on the canvas when using the brush. You will get the following dialog box which will allow you to change the information.

Tip #3 – Gradient Color Duplicator
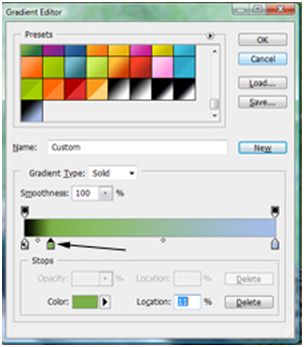
When you are creating a custom Gradient, sometimes you will use the same color multiple times. To duplicate a color, Left click the Color stopper you want to duplicate. Now HOLD down the ALT key on the keyboard and Left click anywhere on the line. Release the ALT key on your keyboard when you are finished. You will see that it duplicates the exact color.

Tip #4 – Eye Dropper For The Background Color
Normally, you Left click the Eye Dropper tool to sample a color from the image. By default, it will change your foreground color. To have it change the background color, HOLD down the ALT key and then sample the color. Release the ALT key on the keyboard when you are done sampling the color for the background color.
Tip #5 – JPEG’s
You should only save it as a JPG when you are finished with all your enhancements. You should never re-save that image again under JPG. Why? Every time that you re-save the image, it will recompress the file. This means you will lose more quality. If you want to open and save it later, we recommend that you save it as a PSD file until you are ready to save it as a JPG.
Tip #6 – Quick Layer Blending Modes
Do you want to see all the blending modes quickly for your image? Here is a quick way to run through the layer blending modes. Left click the top layer and use: Shift-“+” to advance forward in the list of blending modes and Shift “-“ to go to the previous blending mode.
Tip #7 – Switch Opacity Quickly
If you have a tool that has an Opacity option, you can quickly change the opacity by enter 0-9. 0=100%. 1=10%...9=90%. If the tool does NOT have an opacity option, you can still use this quick tip to change the opacity in the layers palette. Bonus Tip – As you can see, it enters values increments of 10%. What if you wanted 12%? Than enter 12 and it will change the opacity.
Tip #8– Increase Thumbnail Size In Layers Palette
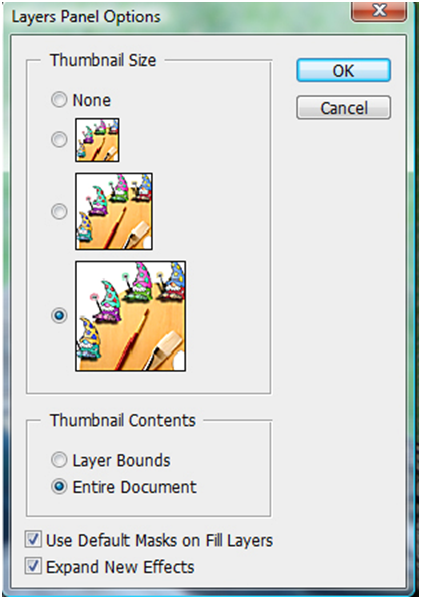
Sometimes you want to increase the thumbnail size in the Layers Palette. Follow these simple steps to change the size of the thumbnail.
Left click the down arrow in the Layers Palette.

Now Left click the “Panel Options…” command.

Left click the Thumbnail Size radio button and Left click the “OK” button.

Tip #9– Hand Tool Within Most Tools
While using a tool (example: brush), you can toggle in between the tool and the Hand tool. For this example, select the brush tool and move the mouse pointer to the actual image. Normally you hold down the Left mouse button and drag to use the brush. But for this example, hold down the “Space” key on the keyboard and you will see that it switches to the Hand tool. Release the “Space” key and you will be taken back to the previous tool.
Tip #10– Zooming Within Most Tools
If you are in a tool (example: brush), you can use the magnifying glass without switching tools. To zoom in, HOLD down the CTRL key and then use the “SPACE” key on the keyboard. To zoom out HOLD down the CTRL-ALT key and use the “SPACE” key on the keyboard. When you are finished, release the CTRL or CTRL-ALT keys.
We hope you enjoyed this list of quick tips and tricks. Please visit us at: http://www.Photoshopeducation.blogspot.com to expand your knowledge within Adobe Photoshop.

Click Picture To Download Video File To View Offline
Download Total Video Player, iTinySoft

Click Picture To Download PDF Tutorial
Download Adobe Reader, Adobe Corporation
Click Picture To Download Supporting Files
(Brushes, Textures, Fonts, Images, Actions, .PSD, Etc.)
Download ZipGenius Standard Edition 6.0.3.1150, Dicono di ZipGenius


No comments:
Post a Comment